Avatar Cloth
This tutorial outlines the recommended sequence for setting up the Carbon Simulation parameters for an Avatar wearing clothing.
This tutorial assumes a basic knowledge of the Houdini SOP framework.
Refer to the Reference and the User Guide sections for more information on the individual parameters that are discussed below.
Initial state of the tutorial scene.
The screenshot above shows the initial state of the tutorial scene which contains a character A-pose, a character animation, and two pieces of clothing, a skirt and a tank top.
Creating A Simulation
First, familiarize yourself with the Carbon TAB menu. The nodes that are used in this tutorial are:
Carbon Simulation node.
Carbon Collider node.

Carbon Cloth node.
Carbon Binding node.
First, create a Carbon Collider node and attach color3, i.e. the collider geometry, to the Carbon Collider.
Then, create a Carbon Cloth node and attach color1, i.e. the skirt geometry, to the first input of the Carbon Cloth.
Then, create a Carbon Cloth node and attach color2, i.e. the tanktop geometry, to the first input of the Carbon Cloth.
Now, connect all 3 Carbon nodes to a Merge SOP node.
Next, create a Carbon Simulation node and pass the output of the merge into the simulation.
The scene should now look as below.
Default Simulation.
The Carbon Collider node, and all other Carbon nodes, are initialized with default values, allowing for a fast and easy setup of a scene which can then be customized to fit a specific need.
Physics Draw
All nodes display Carbon Physics Draw per default. These visualizations are to help gain a better understanding of what the actual physics solver processes. In case of the Collider above, Collision Surface Physics Draw visualizes the actual extruded collision surface. Any changes in, for example, Collider Outer Fatness are immediately reflected in the visualization after a Simulation reset. Changing the Draw Mode to None hides the node’s Physics Draw.
Note
The Carbon Simulation Physics Draw toggle is a simulation-wide override to turn on and off all Physics Draw for all nodes assigned to that simulation.
See also
We can now switch to the Physics Draw tab and make changes to have our nodes reflect the original geometry, i.e. set the colors appropriately.
For Carbon_Cloth1, which represents the skirt, we can tick Use Color and copy the color values from color1 to the Physics Draw Colors.
Changing the Physics Draw.
Now, repeat this step for the other cloth and for the collider.
Correct Physics Draw colors applied.
Simulation Scale
Running the simulation straight out of the box without adjusting any parameters is generally not recommended.
A non-adjusted Scale parameter will lead to an incorrect Carbon Simulation.
If the scale is not set correctly, then the Carbon Simulation simulation will not look right. In this specific case, the cloths appear to be too light and almost floating in space, as shown in the screenshot above.
Now it is necessary to adjust the Carbon Simulation parameters to the character. To get the simulation conditions comparable to real world conditions, it’s easiest to use SI (metric) units.
The Gravity is pre-set to \(9.81 m/s^2\), and in this example, the character has a size of 175 scene units. Using SI units means that the Carbon Simulation always expects size in meters; therefore the Scale parameter has to be set to 0.01, converting 175 scene units to 1.75 meters.
Correct Scale.
Note
As you can see, simulation scale not only affects the objects, but also the scene conditions, such as gravity. Here is a another simple example: you look at a jenga pile falling: It’s fast. Now, compare this to a falling building, it looks very slow because the point of view and scale are bigger.
Now, imagine an artist created a jenga pile, but with units that made it the scale of a building. Everything would look like in low gravity, slow falling. The obvious solution would be to scale down the whole scene including the camera position etc… and then get the right perception. But this would be very time consuming. In order to avoid this, we have the Simulation Scale parameter, which invert-scales all parameters that are length dependent such as gravity and density.
On the legs, you can still see small issues with the Simulation, where the legs poke through the skirt ever so slightly. These issues usually come from Thickness/Fatness values being set incorrectly. We will be addressing these in the next sections.
Adjusting The Collider
Before adjusting any parameters, it is always good practice to rename the Carbon nodes to make it easier to spot what they represent. For example, change Carbon_Collider1 to Carbon_Collider_Avatar.
The next step is to adjust the Carbon Collider properties according to the type of character, the animation sequence and expected collisions.
Collision Model
The default Collision Model for all Carbon objects is Double Sided, meaning that there is only a Thickness value which needs to be set.
This is the easiest and safest option in general, because it prevents issues arising from any open geometry.
In cases of closed geometry, such as the avatar in this tutorial, it is recommended to work with single-sided collision, because it allows to set an Inner Fatness greater than the Outer Fatness. This improves stability and collision resolution when closed geometry can be guaranteed.
- Double Sided
Untick the Double Sided tickbox to change the Collision Model to single-sided.
- Inner Fatness
The Inner Fatness of a Carbon Collider is the attribute that adds volume to the object. The Inner Fatness is in scene units.
An Inner Fatness of 0 automatically turns the collider into a double-sided collider. An Inner Fatness greater than 0 describes a single sided collider. For the Avatar, we want a single sided collider.
The Inner Fatness is limited by the smallest feature such as a finger or a thin region that will interact with the cloth. The Inner Fatness should be no more than half the size of such a feature. Using larger values, e.g. an Inner Fatness of 5 with fingers of 2 units thick will lead to geometry literally being sucked into the Collider. This leads to corruption and can blow up a simulation.

A too large Inner Fatness can easily be detected using the Collision Surface Physics Draw.
Making use of the Collision Surface Physics Draw, as shown in the screenshot above, can quickly visualize if the Inner Fatness is wrong. If it was set up correctly, none of the green drawing should appear.
Now, simply reduce the Inner Fatness, until no more green Physics Draw is visible in any regions that will interact with clothing.
In this case, due to the finger geometry, 0.5 is a safe value.
See also
- Outer Fatness
The Outer Fatness is also measured in scene units. The Outer Fatness of the collider is not limited by the size of the triangles/quads unless it is a deformable collider (a Carbon Morph as used for example in pinch mitigation). But it is important to remember that the real collision surface is at the Outer Fatness distance from the character mesh.
Too big an Outer Fatness can result in a floating-like look of the cloths because the Outer Fatness acts like a buffer.
Also, a big Outer Fatness could result in pinching of the cloth even though the visible cloth mesh may not look pinched.
This is why it is very important to take advantage of the Collision Surface Physics Draw. It gives immediate feedback on what the actual collision surface in the physics solver looks like.
In this case, an Outer Fatness of 0.05 is a good value.
See also
- Filtering Gap
The Carbon Collider provides a Filtering Gap parameter, which, when setting the value greater than 0, automatically turns on an internal collision analysis. At each frame of the simulation, it finds potential pinching situations between cloth and the collider and weakens the collision at these areas.
Note
Remember that pinching can happen between animation frames.
The value of the filtering gap should be set to Filtering Gap = 2 * Cloth Outer Fatness.
If your scene setup contains multiple layers which can be pinched at the same time, set the filtering gap to the sum of the thickness (thickness = 2 * Outer Fatness) values of those layers.
To use filtering gap, simply set the filtering gap parameter to your cloth thickness and run the simulation. This is the easiest way to avoid corruptions and run smooth simulations.
Note
Weakening collisions by using the Filtering Gap results in situations where the collider is penetrating through the cloth, which leads to potentially undesired visual effects.
Given the cut of the tank top in this tutorial, it is not necessary to use filtering.
Open And Non-Manifold Edges
Open Edges and Non-Manifold Edges should be avoided in all collision areas for single sided collision geometries, in order to avoid collision errors.
Collision Mesh Physics Draw and Collision Surface Physics Draw both highlight open edges by drawing them in red color.
Collision Primitive Group
There are situations where some parts of the collider go through one another during an animation, which can lead to cloth corruption. If this happens in areas like armpits, where we need to ensure correct collision resolution, you will most likely have to either use a Filtering Gap (see above for more information), or switch to a Carbon Morph.
However, in this scenario the fingers only go through the character’s legs ever so slightly, or catch the skirt during movement, which means, if only we could remove the fingers from colliding, we would be fine. For these kinds of situations, you can use the Collision Primitive Group parameter. Per default all primitives of the collider geometry are used for collision of this collider against all other objects in the simulation. But if you specify a Collision Primitive Group, only this subset of primitives will be used for collision.
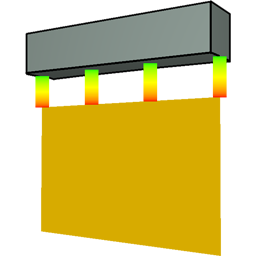
Below, you can see the selection of primitives for the collider. Note that while the head and feet do not cause any issues during the simulation, we removed them from collision because we know that they do not interact with the cloths as all; and removing them from collision improves performance.

Collision Primitive Group selection.
Collision Material
First, keep Animated Material toggled off.
It’s good practice to leave this toggled off when not using animated
parameters because it impacts performance.
The Static Friction and
Dynamic Friction are best set small (for
example 0.5 for the Static Friction and
0.4 for the Dynamic Friction), to
prevent the cloth from gripping too much to the character at the start.
See also
Final Collider Setup
In the image below, you can see that the Collider Physics Draw is different now. Since the Physics Draw is set to Collision Surface, it will not show any geometry that has been excluded from collision via the Collision Primitive Group.

Final setup of the Collider.
Binding The Skirt
Given the current setup of the skirt, it will not stay on the body as the hip movement is slowly shaking it off. In order to prevent this from happening, we can introduce a Carbon Binding which binds a Carbon Cloth to a Carbon Collider.
The process involves 4 steps:
Create a point group on the skirt geometry that contains all points that are to be bound.

Point group for the binding.
Create a Carbon Binding node and add it to the graph between merge1 and the simulation node.
Set the Binding essentials, i.e. Collider/Morph/Soft points to the avatar collider, Soft points to the skirt cloth, Child point group points to the binding point group created in step 1. These are the required minimal steps for every binding setup.
Set up Reference and Properties parameters.
Note
More information on Bindings can be found on the Carbon Binding reference page.
The Carbon Binding created to attach the skirt to the avatar.
Please note that for the screenshot above, we temporarily turned off Physics Draw for the tanktop.
There are 2 main modes to use Carbon Binding: Hard and Soft.
Hard binding occurs when the Radius is set to 0. This means that the attachments of the cloth vertices to the collider are fixed and immovable. This can be too rigid at times and also force the cloth into over constrained situations.
It is therefore recommended to use soft binding, i.e. a Radius > 0.
As soon as the Radius is greater than 0, Stiffness and Viscosity come into effect. Think of this as a non-compressible coil spring attachment where Radius is the maximum extension of the spring and Stiffness controls how much force needs to be applied to extend the spring. This means that a Stiffness of 0 offers no resistance and, under gravity, the cloth will drop by Radius amount of distance. Viscosity controls the dampening of the spring motion and can be used to reduce oscillations.
Certain Reference parameters, such as Parent Face Group, Parent Pose, Child Pose, and Use Surface Offset are optional and do not need to be set for the purpose of this tutorial. Please refer to Examples & All Downloads for examples using those parameters.
Adjusting The Cloths
It takes time and practice to fine-tune all parameters in order to achieve a certain behavior. We can use some values provided by fabric manufacturers in their online catalogs for a material we are interested in simulating and to guide the setup of a material.
In this tutorial, we will aim for cotton-like material for the skirt and the tank top, a more rigid cotton for the skirt and a light cotton for the tank top.
It is best practice to take advantage of the visualization coming from the Carbon Cloth Physics Draw.
The first step should be to double-check that open edges are only existent where they are supposed to be. In case of the skirt, this would only be at the top and bottom hems.
Cloth Model
Carbon Cloth has a variety of cloth models, which each expose different subsets of the range of available parameters for cloth.
The most common and recommended Cloth Model for most applications is the Face-Segment-Crease model, which includes Surface, Stretch and Bending constraints.
See also
Collision Model
Carbon Cloth is a double-sided object, and, unlike Colliders, only has Thickness.
This means that the Cloth Outer Fatness is 0.5 * Thickness.
Online fabric catalogues provide information about material thickness. It is therefore recommended to look up values if a certain material should be replicated with Carbon.
For this example, we might be looking at a top with a total thickness of 4mm.
Given the scene scale, this means that the cloth Thickness should be set to 0.4.
To avoid large Thickness causing self-collision issues, a computed inter-fatness is used internally for self-collision.
Warning
It is best to not abuse big Thickness values as that can lead to reduced performance and can potentially make things worse when multi-layers of cloth get pinched.
See also
Reference
This cloth will not be animated, therefore both Animated Metrics and Animated Angles should be unticked.
Angle Threshold is set to 180 to remove any baked in folds/wrinkles.
Wrinkles Limit does not need to be adjusted.
Please refer to the relevant section of the Carbon Cloth reference page for more detail about these parameters.
Density
Set a value for Density that matches the density of the cloth in the real world in SI units. Remember that the density is mass per area, i.e. \(kg/m^2\) when using SI units in Carbon. Searching the internet, e.g. fabric manufacturers’ online catalogs, for cotton density values will reveal a lot of different values measured in different units. Usually, the values for mass per area are stated in \(oz/yd^2\) or \(g/m^2\).
For example, \(175 gsm\) (grams per square meter) translates to \(0.175 kg/m^2\) in SI units in Carbon. If the weight is in imperial units (\(oz/yd^2\)) then it needs to be converted to metric so for example \(5.8 oz/yd^2 = 197 g/m^2 = 0.197 kg/m^2\) in SI units in Carbon.
For our custom cotton, we pick a value of \(155 g/m^2\) which translates to \(0.155 kg/m^2\).
Stretch
Stiffness
Stretch Stiffness controls the stretching resistance of each edge/segment of the cloth mesh.
To get the value of the Stretch Stiffness by trial and error, you must first deactivate all hard constraints (Stretch Compression and Stretch Extension). This can be done by setting the Stretch Compression to a value of 0.2 and Stretch Extension to a value of 5. (Please do not forget to reset these hard constraints to their original values once you have found a suitable value for the Stretch Stiffness).
In this tutorial, the material is not supposed to stretch (much) under its own weight.
45.85 is a suitable value to prevent this without adding too much extra stiffness, as the material should still be able to stretch, if the character moves, for example.
Note
This parameter should be set in conjunction with the simulation parameters. The more triangles/quads that a cloth contains, the more Iterations are needed to reach convergence. This means that if increasing Stretch Stiffness does not seem to have any effect on the cloth simulation, it is most likely the case that Iterations need to be increased.
See also
Viscosity
The Stretch Viscosity is a ratio used to control damping behavior. A value between 0 and 1 corresponds to a wobbly fiber, a value of 1 is critically damped, and a value over 1 creates an over-damped behavior. A value between 2 to 4 will suffice to avoid stretch oscillations of the cloth as a network and provide a less springy behavior.
Use a Viscosity of 1 for the skirt because it should be a non-elastic cotton skirt.
See also
Compression, Extension, Equilibrium
Stretch Compression and Stretch Extension are hard limits controlling the maximum compression and extension of each edge of the cloth.
Make sure to always allow some Stretch Compression, as this is needed for any creasing to happen.
Stretch Extension is very much material dependent. A jean material will have a value very close to 1.0, while very elastic pieces of clothing might be able to stretch up to a factor of 2.
Stretch Equilibrium controls the cloth’s stretch resting length (equilibrium) as a ratio of the reference length
All of the default values are suitable values for this tutorial.
See also
Bend
Cloth behavior is often defined more by its bending/creasing properties than anything else.
Stiffness
A value around 10 for Bend Stiffness produces very stiff material, such as jean fabric. On the other hand, values smaller than <0.1 are associated with fabrics like silk.
In this tutorial, 2.0 is a suitable value.
Note
This parameter should be set in conjunction with the simulation parameters. The more triangles/quads that a cloth contains, the more Iterations are needed to reach convergence. This means that if increasing Bend Stiffness does not seem to have any effect on the cloth simulation, it is most likely the case that Iterations need to be increased.
See also
Viscosity
The Bend Viscosity is a ratio used to control damping behavior. A value between 0 and 1 corresponds to a wobbly bend behavior, a value of 1 is critically damped, and a value over 1 creates an over-damped behavior. A value between 2 to 4 will suffice to avoid bend oscillations of the cloth as a network and provide a less wobbly behavior.
The Bend Viscosity can be set pretty high and we can exploit this resistance to motion to produce the feel of a heavy material.
In this tutorial, 2.0 is a suitable value.
See also
Yield and Plasticity
Bend Yield and Bend Plasticity parameters control the level of angular plasticity, which is crease persistence.
Most scenarios benefit from light usage of plasticity.
In this tutorial, set Bend Yield to 3 and Bend Plasticity to 0.9. This means that any creases greater than 3 degrees triggers 90 percent plastic deformation.
See also
Limit
By changing the Angular Limit we limit the size of the creases that are possible.
In this tutorial, 40 is a suitable value to allow for some tighter creases.
See also
Surface
Compression and Extension
Surface Compression and Surface Extension are hard limits controlling the maximum surface area compression and extension of each triangle/quad of the cloth.
These parameters actually control the stretchiness of the material. Most types of fabric do actually not stretch but instead only shear.
Having a Stretch Compression < 1.0 and Stretch Extension > 1.0 allows for shearing if Surface Compression and Surface Extension are set to 1.0
If Surface Extension > 1.0, the fabric can stretch.
In most cases, and as well in this tutorial, the material is only allowed to shear, therefore leave both parameters to their default values, which prevent almost all deformation.
See also
Pressure
Pressure describes the force per area over a surface map, exercised by a virtual fluid. It needs to be used with care as it is an explicit force, thus inherently unstable.
In this tutorial, leave the value at 0.0.
See also
Viscous Damping
There are two parameters to help dissipate energy: Viscous Damping local to each cloth and the global simulation Damping.
Cloth Viscous Damping
Viscous Damping controls the damping of a cloth node velocity relative to the inertial motion of the entire cloth.
Strong Viscous Damping gives the cloth a sort of rigid body behavior.
While Viscous Damping is good at reducing local momentum, it does not affect the linear and angular momentum of the cloth center of mass.
For the cotton cloth in this tutorial, use a value of 1.
See also
Simulation Damping
This global parameter is the last resort in killing the kinetic energy of the cloth. It is isotropic and applies to all dynamic objects in the scene.
Setting Simulation Damping too high will make the cloth look like it is lagging behind the character animation.
A value of 1 often improves the look of the cloth simulation by making it slightly less lively.
For the simulation in this tutorial, use a value of 0.1.
Note
- A Carbon Flow could also be used with drag coefficients to simulate dissipation in cloth/fluid interaction.
- Carbon is not strong at dissipating energy due to its formulation. For heavily damped behaviors it is recommended to increase the simulation Iterations. A value of 50 to 100 is sometimes necessary to improve convergence.
Velocity Reducer and Forces
These parameters are not used in simple simulations and are usually used to achieve a certain look/behavior in CFX that does not necessarily reflect real world behavior. This is why we leave them to their default values in this tutorial.
Collision Material
Friction works the same as the collider friction parameters.
Remember that in all collision pairs the smallest friction term from two objects is used in the computation.
Cotton has a frictional ratio of about 0.4. Therefore, use 0.5 for Static Friction and 0.4 for Dynamic Friction
Aerodynamics
Since there will not be any Carbon Flow nodes in this tutorial, we do not need to set the aerodynamics parameters.
See also
Clean Ups
The parameters above are set for the skirt. Please see below for the tank top parameters.
Once all parameters have been applied to both cloth objects, make sure to check that all unused Animated checkboxes are unticked.
Note
It’s good practice to leave Animated toggled off when not using
animated parameters because it impacts performance.
Final Cloth Setup
See below for the final parameters of the Carbon Cloth.
The final Carbon Cloth parameter setup. Skirt on the left and tank top on the right.
Simulation Parameters
This tutorial already talked about Simulation Scale and Simulation Damping.
There are two more Carbon Simulation parameters that need to be adjusted for every simulation.
Simulation Iterations and Simulation Subdivision.
Iterations The number of Simulation Iterations control the convergence, so the more iterations the better the convergence towards the problem solution. The convergence is directly impacted by the size of the problem, the mass ratios between objects interacting, the stiffness desired, etc… In other words, in a complex system it is impossible to tell how many iterations might be needed to converge at a given precision and it gets even worse considering that most problems end up over constrained locally by pinching or collisions singularities. So, we allow you to set a hard limit in number of iterations to balance processing time and convergence while avoiding systems iterating forever around a solution that might not even exist.
Subdivisions Simulation Subdivision is the number of substeps the simulation performs for each frame. Imagine you have a scene at 24 frames per second. So, if you set 10 subdivisions, then the physics solver will perform 10 substeps between each frame, interpolating the information internally to run at 240 Hertz (10 x 24 per second). So, the output is still at a frame every 1/24 seconds but the solver will run 10 solves per frame through substeps of 1/240 second. The number of subdivisions is very important because it controls the accuracy of the collision. If you have small / thin objects and fast motion, then you need higher number of subdivisions to better sample the time to avoid objects interpenetrating. The number of subdivisions is also very important to capture fast oscillations. The time sampling must be smaller than the frequency of the oscillation and the number of subdivisions is your friend in this case too. In summary, any simulation error is relative to the simulation time step (time step = frame step / subdivisions). So, either reducing the frame step or increasing the number of subdivisions will increase precision.
Iterations & Subdivisions Relationship The number of iterations and the number of subdivisions also combine. For example, imagine a simulation using 10 subdivisions but also needing 50 iterations to converge as desired. The same problem with a setting of 20 subdivisions might only need 20 iterations or less to reach the desired convergence while increasing the accuracy of a problem that struggled to converge. The computation time in both cases is roughly the same since the physics will execute 500 solver steps with 10 collision detections in the first case and 400 solver steps with 20 collision detections in the second case.
Convergence The Carbon solver is an iterative solver, meaning that during each simulated frame, it will run a fixed number of iterations towards the “correct” physical solution. The larger the constraints network (i.e. number of triangles/quads), the longer it will take any iterative solver to reach a converged state. This means that with a fixed number of iterations/subdivisions, we will almost never reach a converged state, because most problems are too large.
Final Simulation Setup
See below for the final parameters of the Carbon Simulation and final setup of the scene.
Final state of the tutorial scene.